Picture this: you stumble off a red-eye, shuffle to the taxi line… and your card gets declined. The ATM wants a 12% fee. The kiosk only takes cash. You’re jet-lagged, stuck, and suddenly very aware that winging it
with money was a terrible plan.
I’ve been there. Once. That was enough.
This is the international travel payment strategy I wish I’d had before my first big overseas trip. It’s not about finding one best way to pay overseas. It’s about building a system so that if one thing fails, something else catches you. Cash, cards, apps – all working together.
1. Start with the Big Question: How Much Risk (and Hassle) Can You Tolerate?
Before I decide on cash vs card when traveling abroad, I ask myself two questions for every trip:
- How bad would it be if my main card stopped working for 48 hours?
- How comfortable am I carrying and managing cash in a foreign currency?
Your answers decide your travel budget payment mix.
Most banks and travel sites quietly agree on one thing: a mix wins. Use a credit card for most spending, carry some cash for the gaps, and keep at least one backup method. Capital One, NerdWallet, and others all land on the same idea: there’s no single best way
, just a smart combination that fits how you travel.
Here’s the framework I use for any smart payment plan for international trips:
- Card-first strategy if you hate carrying cash, stick to card-friendly cities, and have at least one card with no foreign transaction fees.
- Cash-heavy strategy if you’re heading to rural areas, markets, or countries where cash is still king.
- App-first strategy (multi-currency cards like Wise or Revolut) if you’re fee-averse and happy managing money on your phone.
We’ll build your mix step by step.
2. Credit Cards: Your Default Workhorse (If You Pick the Right One)
On most trips, my primary tool is a travel-friendly credit card. Not because I love debt, but because:
- It usually has better fraud protection than a debit card.
- It often comes with travel perks – insurance, rental car coverage, lounge access.
- It can earn points or cash back on money I’d spend anyway.
But not all cards are equal overseas. If you want to avoid hidden fees on international card payments, here’s the checklist I run through before a trip:
1. Foreign transaction fees (FTFs)
- Many cards quietly add around 3% to every foreign purchase.
- On a $3,000 trip, that’s about $90 for nothing.
- I strongly prefer cards with no foreign transaction fees. If yours has them, consider a dedicated travel card before a big trip.
2. Network and acceptance
- Visa and Mastercard are the safest bets globally.
- American Express and Discover can be great at home but are patchy abroad.
3. Chip-and-PIN capability
- Some countries still expect a PIN at unattended machines (train kiosks, tolls, gas stations).
- Check if your card supports PIN, not just signature.
4. Rewards vs fees
- Travel cards often trade no FTFs for a higher annual fee.
- I do a quick reality check: will the rewards plus saved fees beat the annual fee in the next 12–18 months?
How I actually use credit cards abroad:
- Flights, hotels, car rentals, tours – all on a rewards credit card.
- At terminals and ATMs, I always choose to pay in the local currency, not my home currency. That avoids dynamic currency conversion markups that can quietly add 5–10%.
- I pay the balance in full when I get home. Otherwise, interest wipes out any rewards.
If you only remember one thing about cards: no FTFs + local currency = less leakage.
3. Debit Cards & ATMs: Your Cash Pipeline (Not Your Main Weapon)
Debit cards shine at one thing: pulling local cash from ATMs. I treat them as a tool, not my main spending method in any international travel payment strategy.
Why I use debit mainly for cash:
- ATM withdrawals usually use a fair interbank rate, better than airport kiosks.
- I avoid carrying huge amounts of cash from home.
- If a debit card is compromised, it’s my actual money at risk, not a credit line – so I keep balances sensible.
The catches (and how I dodge them):
- ATM fees: Your bank may charge a fee, and the foreign ATM operator may add another. I check my bank’s fee schedule and look for partner banks abroad.
- Foreign transaction fees: Some banks add 2–3% on top of ATM withdrawals. I prefer accounts that waive or reduce these.
- Holds and overdrafts: Hotels and car rentals can place holds on debit cards. I avoid using debit for deposits and keep overdraft protection turned off if possible.
My ATM rules:
- Withdraw larger amounts less often to reduce per-withdrawal fees.
- Avoid airport and tourist ATMs when I can; they often have worse rates and higher fees.
- At the ATM screen, I decline any conversion and choose to be charged in the local currency.
In practice, I bring one debit card for cash and keep a backup card in a separate place in case the first one is lost or eaten by a machine.
4. Cash: How Much Is Enough (Without Feeling Like a Walking ATM)?
Every guide says carry some cash
. Not very helpful. I prefer numbers when I’m deciding how much cash for an international trip.
My rule of thumb: arrive with enough local currency to cover the first 24–48 hours without touching an ATM.
That usually means:
- Airport transport (taxi, train, bus)
- First meal or two
- Small emergencies (SIM card, snacks, tips, public restrooms)
Depending on the country, that might be the equivalent of $50–$150. In cash-heavy places, I bump it up.
Why cash still matters:
- Markets, street food, small family shops.
- Taxis and tips, especially where card readers are unreliable.
- Places with weak internet or power cuts – card terminals just don’t work.
There’s a bonus many people miss: sometimes cash gets you a small discount because merchants avoid card processing fees. I’ve had guesthouses knock off a few percent for cash payment. It never hurts to ask, politely.
Where I get my cash:
- Before departure: I sometimes order a small amount of foreign currency from a reputable provider or my bank. Rates are usually better than airport kiosks, and I avoid classic airport currency exchange mistakes.
- On arrival: I use a bank ATM in the arrivals hall or in the city, not the flashy
tourist
machines.
Security habits that keep me sane:
- I never carry all my cash at once. I keep a day wallet and stash the rest in the hotel safe or a hidden pocket.
- I treat cash as a budgeting tool. If I’m prone to overspending, I give myself a daily cash allowance and leave the card in the room for a few hours.
5. Apps & Multi-Currency Cards: The New Middle Ground
If you hate hidden fees and like control, multi-currency apps and cards (like Wise or Revolut) are worth a look. They sit somewhere between a bank card and a prepaid travel card and can be a strong alternative in the travel money cards vs cash debate.
What they do:
- Let you hold multiple currencies in one account.
- Convert money at or near the mid-market rate, often cheaper than traditional banks.
- Give you a physical or virtual card to spend abroad.
Why I like them:
- I can convert money in advance when rates look good.
- Fees are usually transparent – I see exactly what I’m paying.
- If the card is compromised, it’s not my main bank account.
But there are catches:
- ATM withdrawals may have limits and fees after a certain amount.
- Reload times can vary – not ideal if you wait until you’re already at the checkout.
- Acceptance is usually good (they’re often on Visa/Mastercard rails), but I still carry a traditional backup card.
On some trips, I’ve used a multi-currency card as my daily driver and kept a credit card for hotels and emergencies. On others, I’ve skipped it entirely. It’s optional, but powerful if you’re fee-sensitive and like using travel apps for payments abroad.
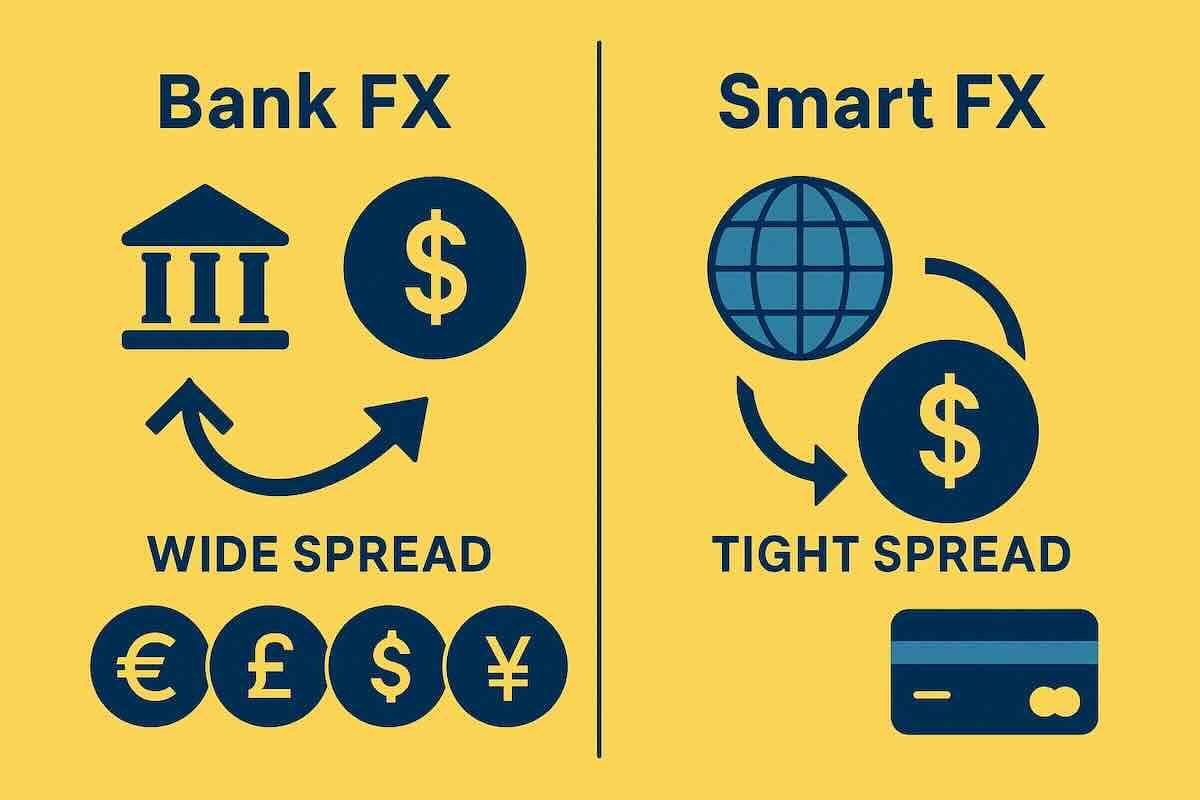
6. Beating the Silent Fee: Always Pay in Local Currency
This is the trap that catches even experienced travelers: dynamic currency conversion (DCC).
You’ve seen it. The terminal asks:
Pay 100 EUR or 112 USD?
Paying in your home currency feels comforting. You see the exact amount. But behind that convenience is often a steep markup baked into the exchange rate – sometimes doubling your effective conversion cost.
My rule is absolute: I always choose the local currency at payment terminals and ATMs.
Why?
- When I choose local currency, my card network (Visa/Mastercard) handles the conversion at a standard floating rate.
- When I choose my home currency, the merchant or ATM sets the rate and adds their own margin.
On a single coffee, the difference is tiny. On a week of hotels, restaurants, and tours, it can be hundreds of dollars. I’d rather use a currency converter app to understand costs than pay for the illusion of certainty.
So at every terminal, I slow down, read the screen, and tap local currency. Every time.
7. Building Your Redundancy Plan (So You Don’t Get Trapped at the Airport)
Now let’s turn this into a concrete plan you can actually use. I think in terms of layers – if one fails, the next one catches me.
Layer 1: Primary card
- One no-foreign-transaction-fee credit card (Visa or Mastercard).
- Used for: flights, hotels, restaurants, big purchases.
Layer 2: Cash buffer
- Enough local currency for 1–2 days.
- Used for: taxis, tips, markets, emergencies.
Layer 3: Debit card for ATMs
- One debit card from a bank with reasonable ATM and FX fees.
- Used for: topping up cash when needed.
Layer 4: Backup card
- A second credit or debit card, ideally from a different bank and network.
- Stored separately – in a hotel safe, another bag, or money belt.
Layer 5: Optional multi-currency app/card
- For fee optimization and better control if you’re comfortable with apps and want to trim multi currency travel card costs.
Before every trip, I run through a quick checklist:
- Notify banks of travel (or confirm they no longer require it).
- Confirm PINs for all cards.
- Photocopy or scan the front/back of cards and store securely (password manager, encrypted file).
- Save emergency numbers for card cancellation in my phone and on paper.
It sounds like overkill. It isn’t. When a card gets cloned or a bank’s fraud system overreacts, this is what keeps you from being the person at the airport, stuck at the ATM, wondering what went wrong.

8. Put It All Together: Your Personal Payment Strategy
Let’s turn this into something you can actually use on your next trip. Here’s a simple way to design your own international travel payment strategy in about 10 minutes.
Step 1: Choose your default
- If you have a no-FTF credit card: make that your primary.
- If you don’t: consider a multi-currency card or a debit card with low FX fees as your main tool.
Step 2: Decide your cash comfort level
- Card-heavy city trip? Maybe $50–$100 equivalent is enough.
- Rural or cash-heavy country? Maybe $150–$300 equivalent.
Step 3: Build your backup stack
- One backup card, stored separately.
- One debit card for ATMs.
- Optional: multi-currency app/card if you care about squeezing out every fee.
Step 4: Set your rules
- Always pay in local currency.
- Use credit for big purchases, debit for cash, cash for small or card-unfriendly places.
- Withdraw cash in chunks, but don’t carry it all at once.
Step 5: Stress-test your plan
- If your main card died tomorrow, could you still:
- Get from the airport to your hotel?
- Eat for 24 hours?
- Access more money within a day?
If the answer is yes
, you’ve built a solid travel budget payment mix. If not, add one more layer – a backup card, a bit more cash, or a multi-currency app – until you’re covered.
Travel is unpredictable. Your payment plan doesn’t have to be. Build it once, tweak it for each trip, and you’ll spend less time fighting ATMs and more time actually enjoying where you are.